使用 Maven 管理 java 项目

使用 Maven 管理 java 项目

什么是 Maven

Maven 是专门用于管理和构建 Java 项目的工具,它的主要功能有:

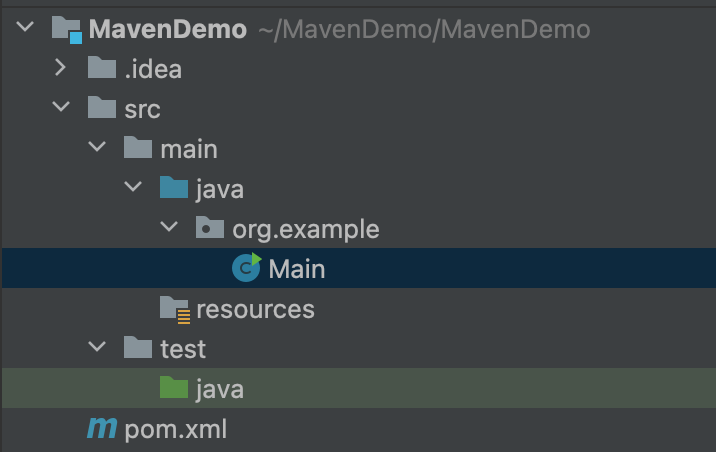
  • 提供一套标准化的项目结构

  • 提供一套标准化的构建流程(编译,测试,打包,发布)

  • 提供一套依赖管理机制

    若只需在 IDEA 中使用 Maven 可直接跳到后面

安装和配置 Maven

安装

使用 homebrew 安装,打开终端输入

1
brew install maven

验证是否安装成功

1
mvn -version

若出现如下输出则安装成功, 安装目录及为 Maven home 所示目录,请记录其位置,后续需要使用

若显示未找到 JAVA_HOME (若未下载 JDK 请自行搜索下载)

在终端输入

1
/usr/libexec/java_home

输出目录即为 java_home 目录

打开终端配置文件(若为 zsh 则使用命令 vim .zshrc ,若为 bash 则使用命令 vim .bash_profile ),在最后添加

1
export JAVA_HOME=/Users/zjt/Library/Java/JavaVirtualMachines/openjdk-19.0.1/Contents/Home

重启终端后在输入mvn -version 即可正确输出。

环境配置

配置本地仓库

本地仓库用于存储下载的依赖 jar 包

选择你喜欢的位置创建名为 mvn_resp 的文件夹(也可自行命名,下文mvn_resp替换为你的命名)

打开上述 maven Home 目录下的 conf 目录

打开目录下的 settings.xml 文件,找到如下位置

1
2
3
4
5
6
7
8
9
10
11
12
13
14
15
16
17
<settings xmlns="http://maven.apache.org/SETTINGS/1.2.0"
xmlns:xsi="http://www.w3.org/2001/XMLSchema-instance"
xsi:schemaLocation="http://maven.apache.org/SETTINGS/1.2.0 https://maven.apache.org/xsd/settings-1.2.0.xsd">
<!-- localRepository
| The path to the local repository maven will use to store artifacts.
|
| Default: ${user.home}/.m2/repository
<localRepository>/path/to/local/repo</localRepository>
-->
<!-- interactiveMode | This will determine whether maven prompts you when it needs input. If set to false,
| maven will use a sensible default value, perhaps based on some other setting, for
| the parameter in question.
|
| Default: true
<interactiveMode>true</interactiveMode>
-->

<localRepository>/path/to/local/repo</localRepository> 复制到 -->下一行,并将 /path/to/local/repo 改为你选择的仓库地址,类似如下

1
2
3
4
5
6
7
8
9
10
11
12
13
14
15
16
17
18
<settings xmlns="http://maven.apache.org/SETTINGS/1.2.0"
xmlns:xsi="http://www.w3.org/2001/XMLSchema-instance"
xsi:schemaLocation="http://maven.apache.org/SETTINGS/1.2.0 https://maven.apache.org/xsd/settings-1.2.0.xsd">
<!-- localRepository
| The path to the local repository maven will use to store artifacts.
|
| Default: ${user.home}/.m2/repository
<localRepository>/path/to/local/repo</localRepository>
-->
<localRepository>/opt/homebrew/Cellar/maven/3.9.0/mvn_resp</localRepository>
<!-- interactiveMode | This will determine whether maven prompts you when it needs input. If set to false,
| maven will use a sensible default value, perhaps based on some other setting, for
| the parameter in question.
|
| Default: true
<interactiveMode>true</interactiveMode>
-->

配置阿里云私服

由于 Maven 默认仓库在国外,配置阿里云私服可提高下载速度

使用阿里云私服

在上述 settings.xml 文件中找到如下位置

1
2
3
4
5
6
7
8
9
10
11
12
13
14
15
16
17
18
19
20
21
<mirrors>
<!-- mirror
| Specifies a repository mirror site to use instead of a given repository. The repository that
| this mirror serves has an ID that matches the mirrorOf element of this mirror. IDs are used
| for inheritance and direct lookup purposes, and must be unique across the set of mirrors.
|
<mirror>
<id>mirrorId</id>
<mirrorOf>repositoryId</mirrorOf>
<name>Human Readable Name for this Mirror.</name>
<url>http://my.repository.com/repo/path</url>
</mirror>
-->
<mirror>
<id>maven-default-http-blocker</id>
<mirrorOf>external:http:*</mirrorOf>
<name>Pseudo repository to mirror external repositories initially using HTTP.</name>
<url>http://0.0.0.0/</url>
<blocked>true</blocked>
</mirror>
</mirrors>

下添加如下代码

1
2
3
4
5
6
<mirror>
<id>alimaven</id>
<mirrorOf>central</mirrorOf>
<name>aliyun maven</name>
<url>http://maven.aliyun.com/nexus/content/groups/public/</url>
</mirror>

阿里云私服配置完毕!

Maven 使用

Maven 项目树目录

Maven命令行基本使用

注意:以下命令需在 pom.xml 对应目录下使用

  • compile: 编译

    用于编译 java 项目生成 .class 文件

    1
    mvn compile

    编译后可在生成的 target 目录下找到对应文件

  • clean: 清理

    用于删除编译生成的文件

    1
    mvn clean
  • test: 测试

    用于测试项目,执行 test 目录下的代码

    1
    mvn test
  • package: 打包

    用于打包生成.jar文件(在 target 目录下)

    1
    mvn package
  • install 安装

    用于将当前项目安装到本地仓库

    1
    mvn install

Maven 生命周期

  • Pre-clean —> clean —> post-claen
  • Compile —> test —> package —> install
  • Pre-site —> site —> post-site

同一生命周期内,执行后面的命令,前面的命令会自动执行

IntelliJ IDEA 使用 Maven

IDEA自带 Maven (经典白学

点击 Intelij IDEA –> Preferences 搜索 Maven 看到如下界面
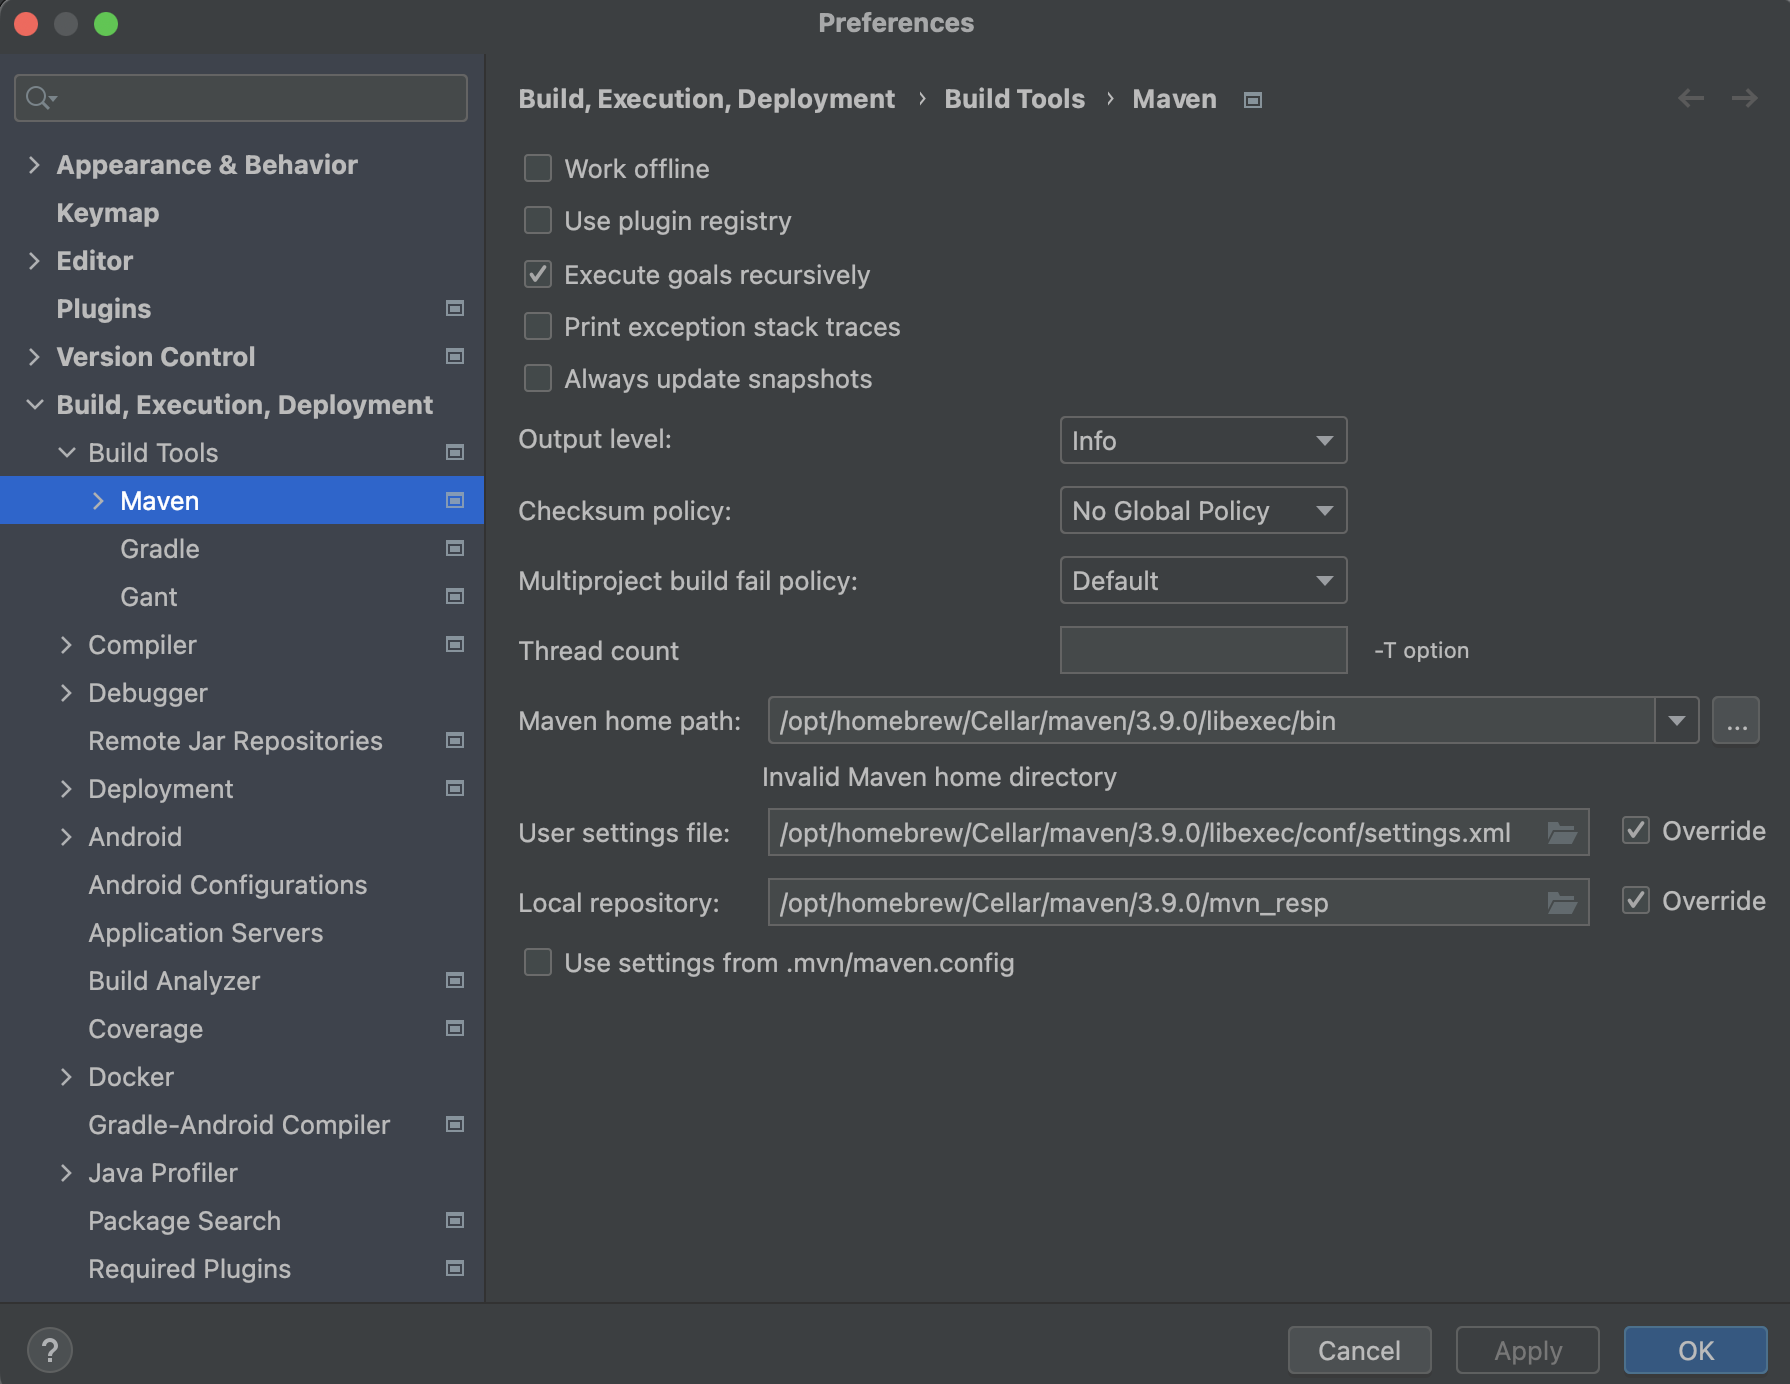
可将Maven home path ,User settings file, Local repository 换成之前设置的目录

创建 Maven 项目
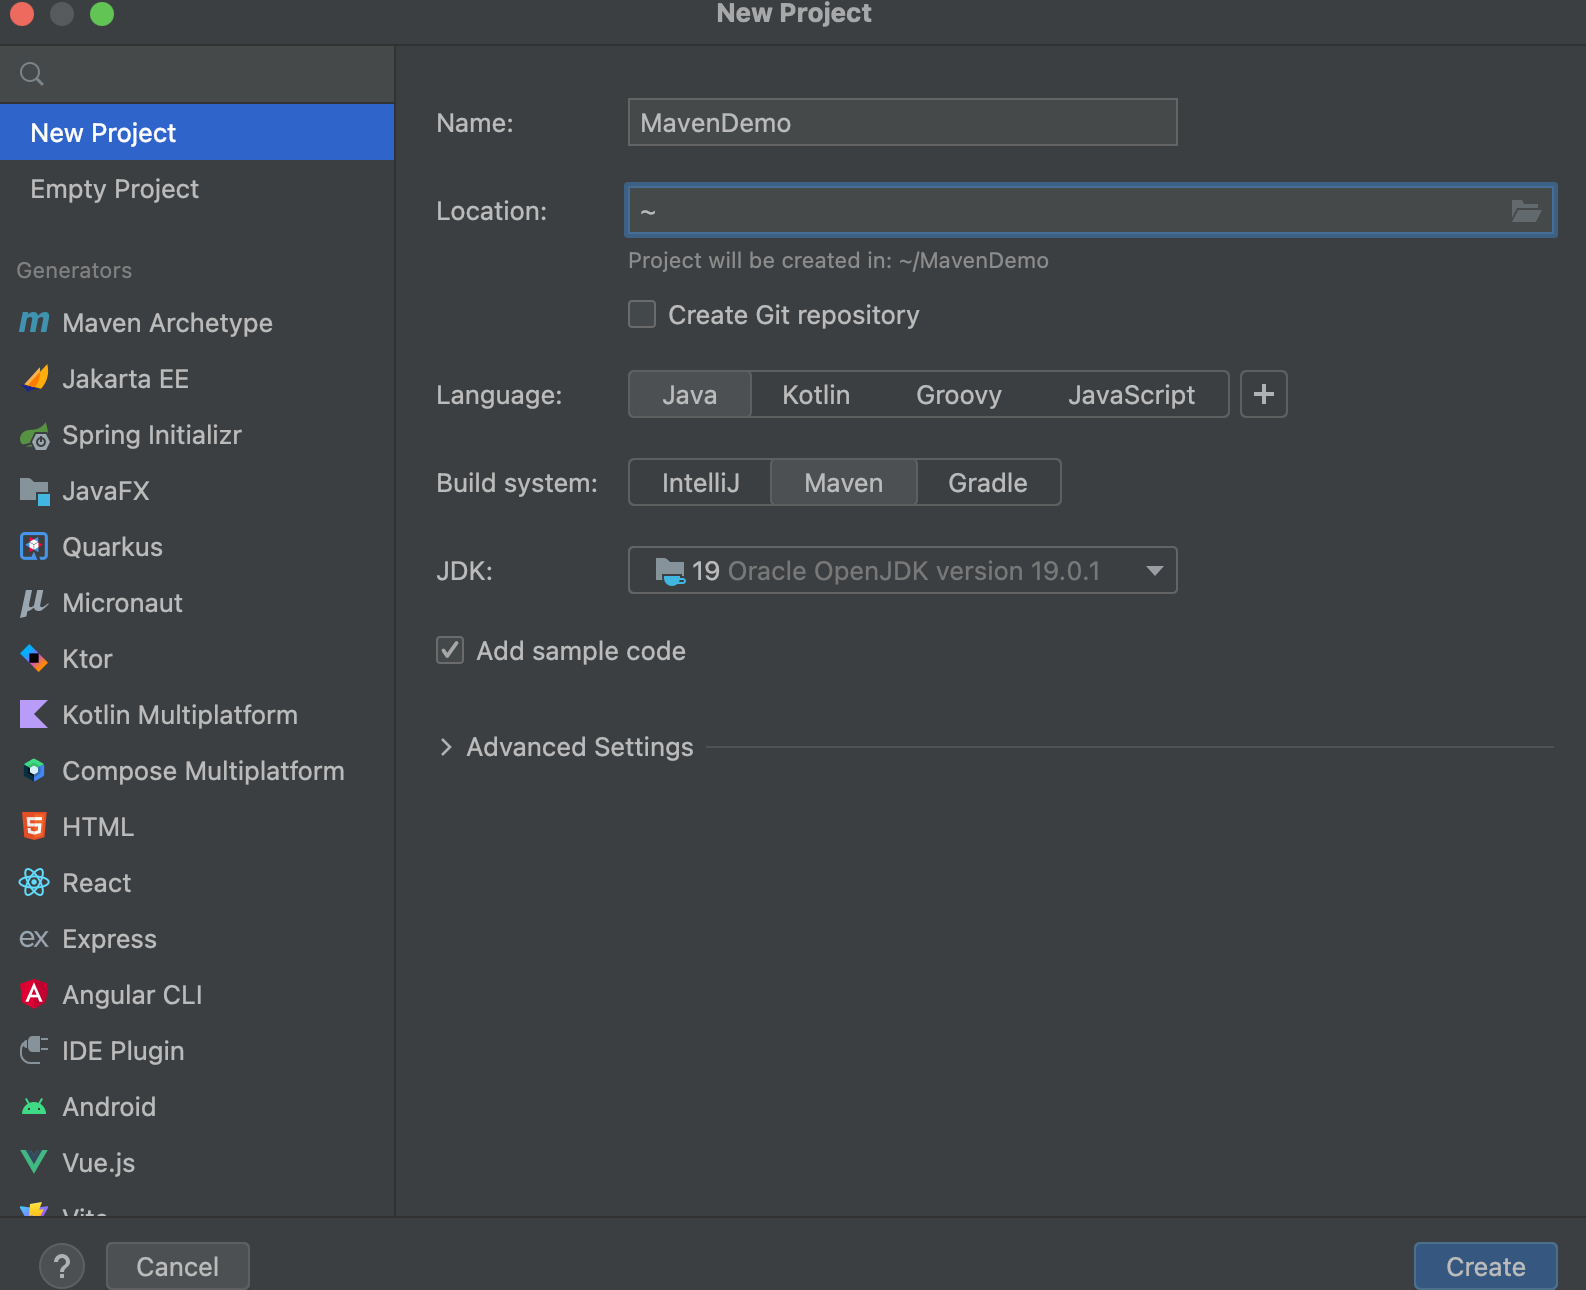
Build system 选择 Maven 即可

添加依赖

打开 pom.xml 文件,在 </project> 前 添加类似如下语句

1
2
3
4
5
6
7
8
9
10
11
12
13
<dependencies>
<dependency>
<groupId>junit</groupId>
<artifactId>junit</artifactId>
<version>4.13</version>
<scope>test</scope>
</dependency>
<dependency>
<groupId>mysql</groupId>
<artifactId>mysql-connector-java</artifactId>
<version>5.1.46</version>
</dependency>
</dependencies>

点击右上角 Maven 刷新按钮即可将依赖添加到项目

依赖优先从本地仓库中搜索,若未找到从私服下载,若没有从中央仓库下载。

导入 Maven 项目

点击IDEA 右侧 Maven 栏,点击 +找到需要导入的 Maven 项目的 pom.xml 文件,点击 open 即可导入该项目。


使用 Maven 管理 java 项目
http://mrzzzz1.github.io/2023/03/07/使用maven管理java项目/
作者
Mrzzzz1
更新于
2023年3月8日
许可协议