Mybatis 导入项目和使用

Mybatis 导入项目和使用

什么是 Mybatis

  • Mybatis 是一款优秀的持久层框架,用于简化 JDBC 开发, 它支持自定义 SQL、存储过程以及高级映射。

  • 避免硬编码,方便维护

  • 官网 : https://mybatis.org/mybatis-3/zh/index.html

导入 Mybatis

使用 Maven 导入 Mybatis 包 ( 配置 Maven )

打开项目的 pom.xml 文件,添加依赖(自行选择版本),并刷新( mysql 驱动等其他包请自行导入)

1
2
3
4
5
<dependency>
<groupId>org.mybatis</groupId>
<artifactId>mybatis</artifactId>
<version>3.5.5</version>
</dependency>

编写核心配置文件

在项目 resources 目录下创建 mybatis-config.xml 文件
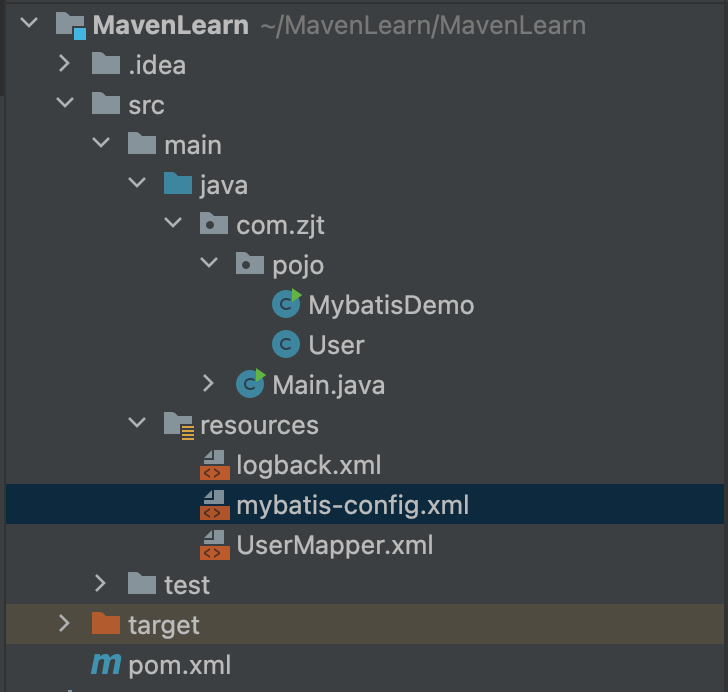
向文件中写入如下配置

1
2
3
4
5
6
7
8
9
10
11
12
13
14
15
16
17
18
19
20
21
22
<?xml version="1.0" encoding="UTF-8" ?>
<!DOCTYPE configuration
PUBLIC "-//mybatis.org//DTD Config 3.0//EN"
"https://mybatis.org/dtd/mybatis-3-config.dtd">
<configuration>
<environments default="development">
<environment id="development">
<transactionManager type="JDBC"/>
<dataSource type="POOLED">
<!--数据库连接信息-->
<property name="driver" value="${driver}"/>
<property name="url" value="${url}"/>
<property name="username" value="${username}"/>
<property name="password" value="${password}"/>
</dataSource>
</environment>
</environments>
<mappers>
<!--加载sql映射文件-->
<mapper resource="org/mybatis/example/BlogMapper.xml"/>
</mappers>
</configuration>

根据实际情况更改数据库连接信息和 sql 映射文件信息,需与下文配置 sql 映射文件对应,如

1
2
3
4
5
6
7
8
9
10
11
12
13
14
15
16
17
18
19
20
21
22
<?xml version="1.0" encoding="UTF-8" ?>
<!DOCTYPE configuration
PUBLIC "-//mybatis.org//DTD Config 3.0//EN"
"https://mybatis.org/dtd/mybatis-3-config.dtd">
<configuration>
<environments default="development">
<environment id="development">
<transactionManager type="JDBC"/>
<dataSource type="POOLED">
<!--数据库连接信息-->
<property name="driver" value="com.mysql.jdbc.Driver"/>
<property name="url" value="jdbc:mysql://127.0.0.1:3306/mybatis?useSSL=false"/>
<property name="username" value="root"/>
<property name="password" value="123456"/>
</dataSource>
</environment>
</environments>
<mappers>
<!--加载sql映射文件-->
<mapper resource="UserMapper.xml"/>
</mappers>
</configuration>

配置 sql 映射文件

创建 sql 映射文件 (UserMapper.xml) ,文件名自取 如图需与 mybatis-config.xml 中的 mapper resource 对应

写入如下内容

1
2
3
4
5
6
7
8
9
<?xml version="1.0" encoding="UTF-8" ?>
<!DOCTYPE mapper
PUBLIC "-//mybatis.org//DTD Mapper 3.0//EN"
"https://mybatis.org/dtd/mybatis-3-mapper.dtd">
<mapper namespace="test">
<select id="selectAll" resultType="com.zjt.pojo.User">
select * from tb_users;
</select>
</mapper>
  • namespace 名字空间,自取

  • 一个 select 元素对应一条 sql 语句

  • id 为该 sql 语句唯一标识,不可重复

  • resultType 放回类型,可以是基本类型,也可以是自定义类

编写查询代码

1
2
3
4
5
6
7
8
9
10
11
12
13
14
15
public class MybatisDemo {
public static void main(String[] args) throws IOException {
//加载 mybatis 核心配置文件
String resource = "mybatis-config.xml";
InputStream inputStream = Resources.getResourceAsStream(resource);
//获取 SqlSessionFactory
SqlSessionFactory sqlSessionFactory = new SqlSessionFactoryBuilder().build(inputStream);
//获取 sqlSession 对象
SqlSession sqlSession = sqlSessionFactory.openSession();
//查询
List<User> users = sqlSession.selectList("test.selectAll");
System.out.println(users);
sqlSession.close();
}
}

解决SQL映射文件警告

  • 产生原因: IDEA 和数据库没有建立连接,不能识别表信息。

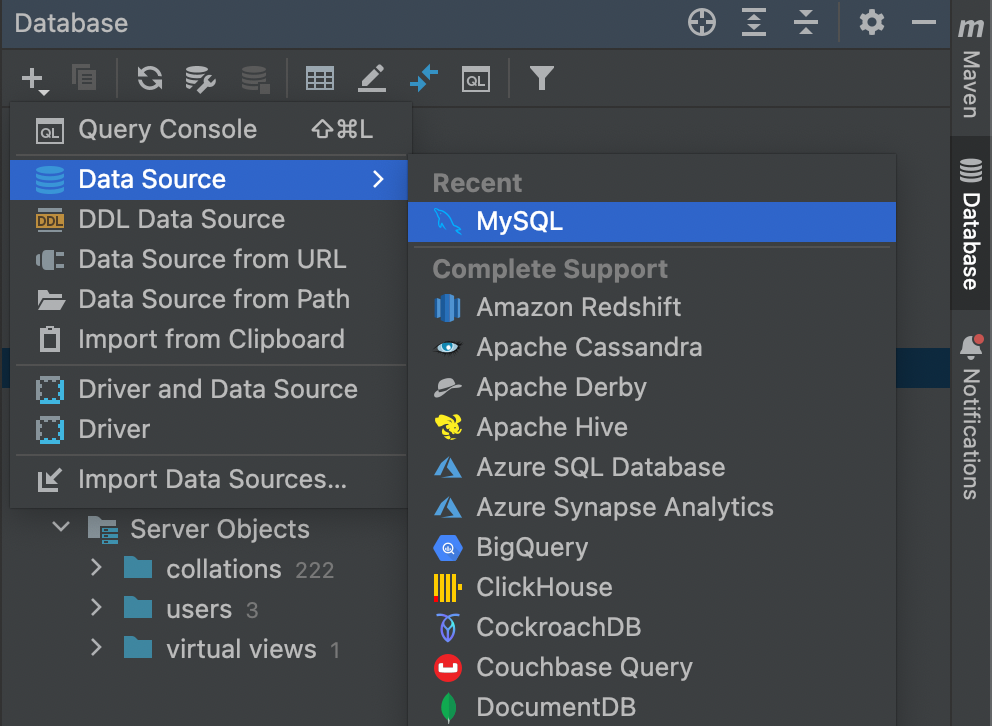
  • 解决方式:在IDEA 中配置 MySQL 数据库连接

​ 点击右侧 Database, 点击 +选择 Data Source 中的 MySQL , 按照提示输入用户名密码等连接数据库

即可在 IDEA 中像 Navicat 一样操作数据库。

在 file –> settings 搜索 sql dialet 选择 mysql 即可使用代码补全

Mapper 代理开发

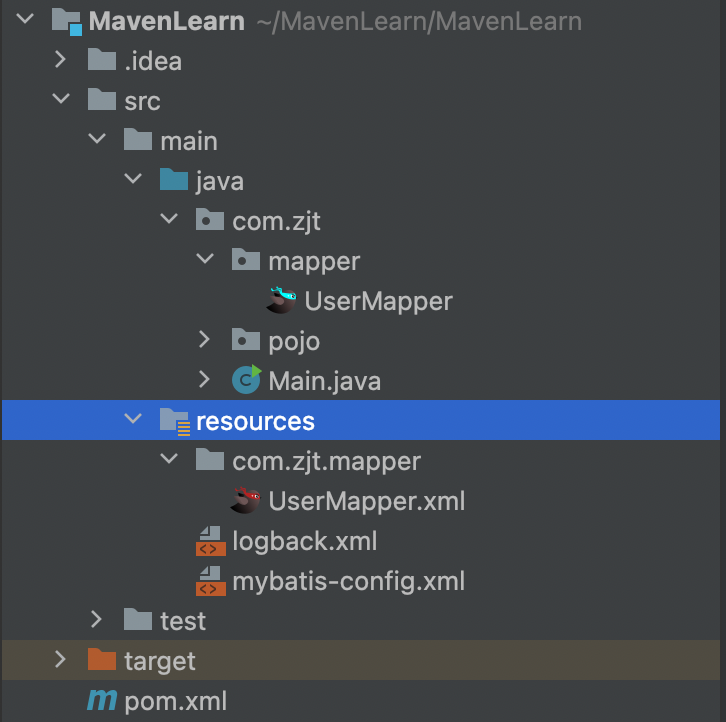
  1. 定义与 SQL 映射文件同名的 Mapper 接口,并将 Mapper 接口和 SQL 映射文件放置在同一目录下

    在 resources 下创建与 Mapper 所在包名相同的 Directory ,注意使用 / 代替1包名中的 .

    image-20230308221810618

  2. 设置 SQL 映射文件中的 namespace 为 Mapper 接口全限定名

  3. 在 Mapper 接口中定义方法,方法名就是 SQL 映射文件中 sql 语句的 id ,并保持参数和返回值类型一致

    1
    2
    3
    4
    5

    public interface UserMapper {
    List<User> selectAll();
    User selectById(int id);
    }
    1
    2
    3
    4
    5
    6
    7
    8
    <mapper namespace="com.zjt.mapper.UserMapper">
    <select id="selectAll" resultType="com.zjt.pojo.User">
    select * from tb_users;
    </select>
    <select id="selectById" resultType="com.zjt.pojo.User">
    select * from tb_users where id = #{id};
    </select>
    </mapper>

    使用 #{} 传参 ,${} 也可传参,但不能防止 sql 注入

  4. 编码

    • 通过 SqlSession 的 getMapper 方法获取 Mapper 接口代理对象
    • 通过调用方法完成 sql 执行
    1
    2
    3
    4
    5
    6
    7
    8
    9
    10
    11
    12
    13
    14
    15
    public class MybatisDemo2 {
    public static void main(String[] args) throws IOException {
    String resource = "mybatis-config.xml";
    InputStream inputStream = Resources.getResourceAsStream(resource);
    SqlSessionFactory sqlSessionFactory = new SqlSessionFactoryBuilder().build(inputStream);

    SqlSession sqlSession = sqlSessionFactory.openSession();
    // List<User> users = sqlSession.selectList("test.selectAll");

    UserMapper mapper = sqlSession.getMapper(UserMapper.class);
    List<User> users = mapper.selectAll();
    System.out.println(users);
    sqlSession.close();
    }
    }

若 Mapper 接口名称和 SQL 映射文件名称相同,并在同一目录下,则可以使用包扫描的方式简化 SQL 映射文件的加载

1
2
3
4
<!--mybatis-config.xml-->
<mapper resource="com/zjt/mapper/UserMapper.xml"/>
<!-- 替换为-->
<package name="com.zjt.mapper"/>

Mybatis 核心文件配置

environments

1
2
3
4
5
6
7
8
9
10
11
12
13
14
15
16
17
18
19
20
21
22
<environments default="development">
<environment id="development">
<transactionManager type="JDBC"/>
<dataSource type="POOLED">
<!--数据库连接信息-->
<property name="driver" value="com.mysql.jdbc.Driver"/>
<property name="url" value="jdbc:mysql://127.0.0.1:3306/mybatis?useSSL=false"/>
<property name="username" value="root"/>
<property name="password" value="zjt031015"/>
</dataSource>
</environment>
<environment id="test">
<transactionManager type="JDBC"/>
<dataSource type="POOLED">
<!--数据库连接信息-->
<property name="driver" value="com.mysql.jdbc.Driver"/>
<property name="url" value="jdbc:mysql://127.0.0.1:3306/mybatis?useSSL=false"/>
<property name="username" value="root"/>
<property name="password" value="zjt031015"/>
</dataSource>
</environment>
</environments>

可配置多个数据库环境,如开发,测试,发布等,通过更改 default 选择不同环境

别名

1
2
3
<typeAliases>
<package name="com.zjt.pojo"/>
</typeAliases>

包扫描后使用包中的类不用加包名

注意配置文件的顺序

MybatisX插件

  • XML 和接口方法相互跳转

  • 根据接口方法生成 statement

    在 IDEA 中安装即可

名称不一致问题

当数据库表中的字段名称和实体类的属性名称不一致时,不能自动封装数据

解决方案

  1. 对数据库表子段名起别名

    1
    2
    3
    <select id="selectAll" resultType="com.zjt.pojo.Brand">
    select id, brand_name brand, company_name companyName, ordered, description, status from tb_brand;
    </select>
  2. 使用 sql 片段

1
2
3
4
5
6
<sql id="brand_column">
id, brand_name brand, company_name companyName, ordered, description, status
</sql>
<select id="selectAll" resultType="com.zjt.pojo.Brand">
select <include refid="brand_column"></include> from tb_brand;
</select>
  1. 使用 resultMap(推荐)

    1
    2
    3
    4
    5
    6
    7
    8
    9
    <resultMap id="brandResultMap" type="com.zjt.pojo.Brand">
    <id column="id" property="id"/>
    <result column="brand_name" property="brandName"/>
    <result column="company_name" property="companyName"/>
    </resultMap>

    <select id="selectAll" resultMap="brandResultMap">
    select * from tb_brand;
    </select>

    ​ 添加 resultMap , 将 select 中的 resultType 改为 resultMap,使用 id 完成主键字段映射, result 完成其他字段映射。

特殊字符处理

Xml 文件不能使用 <等符号

解决方案

  1. 转义字符
1
select * from tb_brand where id &lt #{id};
  1. CDATA 区
1
2
3
4
5
6
7
<select id="selectById" resultType="com.zjt.pojo.Brand">
select * from tb_brand where id
<![CDATA[
<
]]>
#{id};
</select>

多参数传递

假设 查询语句为

1
2
3
4
5
6
7
<select id="selectByCondition" resultType="com.zjt.pojo.Brand">
select *
from tb_brand
where status = #{status}
and company_name like #{companyName}
and brand_name like #{brandName}
</select>
  1. 使用@Pama 注解散装参数

    1
    2
    3
    List<Brand> selectByCondition(@Param("status") int status,
    @Param("companyName") String companyName,
    @Param("brandName") String brandName);
  2. 对象参数,对象属性名称与参数占位符名称一致,调用相应 get 方法

    1
    List<Brand> selectByCondition(Brand brand);
  3. Map 参数,需 map 中的 key 与参数占位符名称一致

    1
    List<Brand> selectByCondition(Map map);

动态 SQL

多条件动态条件查询

用于有多个条件限制,某些条件可能没有输入

  • 使用 if

    1
    2
    3
    4
    5
    6
    7
    8
    9
    10
    11
    12
    13
    14
    15
    <select id="selectByCondition" resultMap="brandResultMap">
    select *
    from tb_brand
    where
    <if test="status != null">
    status = #{status}
    </if>
    <if test="companyName != null and companyName != '' ">
    and company_name like #{companyName}
    </if>

    <if test="brandName != null and brandName != '' ">
    and brand_name like #{brandName}
    </if>
    </select>

    当某些条件不存在时,可能会因为 and 不符合 sql 语句格式报错

    解决方案

  • 在最前面加 1=1,每个条件前加sql

    1
    2
    3
    4
    5
    6
    7
    8
    9
    10
    11
    12
    13
    14
    15
    <select id="selectByCondition" resultMap="brandResultMap">
    select *
    from tb_brand
    where 1=1
    <if test="status != null">
    and status = #{status}
    </if>
    <if test="companyName != null and companyName != '' ">
    and company_name like #{companyName}
    </if>

    <if test="brandName != null and brandName != '' ">
    and brand_name like #{brandName}
    </if>
    </select>
  • 使用 <while> 替换 while 关键字

    1
    2
    3
    4
    5
    6
    7
    8
    9
    10
    11
    12
    13
    14
    15
    16
    17
    <select id="selectByCondition" resultMap="brandResultMap">
    select *
    from tb_brand
    <where>
    <if test="status != null">
    status = #{status}
    </if>
    and
    <if test="companyName != null and companyName != '' ">
    company_name like #{companyName}
    </if>
    and
    <if test="brandName != null and brandName != '' ">
    brand_name like #{brandName}
    </if>
    </where>
    </select>

单条件动态条件查询

从多个条件中选择一个条件生效

使用 <choose> <when> <otherwise> 标签

1
2
3
4
5
6
7
8
9
10
11
12
13
14
15
16
<select id="selectByConditionSingle" resultMap="brandResultMap">
select *
from tb_brand
where
<choose><!--相当于switch-->
<when test="status != null"><!--相当于case-->
status = #{status}
</when>
<when test="companyName != null and companyName != '' ">
company_name like #{companyName}
</when>
<when test="brandName != null and brandName != ''">
brand_name like #{brandName}
</when>
</choose>
</select>

当用户没有输入时 sql 语法报错

解决方案

  1. 在最后加上 <otherwise>1=1</otherwise> 搜索全部。

    1
    2
    3
    4
    5
    6
    7
    8
    9
    10
    11
    12
    13
    14
    15
    16
    17
    18
    19
    <select id="selectByConditionSingle" resultMap="brandResultMap">
    select *
    from tb_brand
    where
    <choose><!--相当于switch-->
    <when test="status != null"><!--相当于case-->
    status = #{status}
    </when>
    <when test="companyName != null and companyName != '' ">
    company_name like #{companyName}
    </when>
    <when test="brandName != null and brandName != ''">
    brand_name like #{brandName}
    </when>
    <otherwise>
    1=1
    </otherwise>
    </choose>
    </select>
  2. 使用 <where> 标签

    1
    2
    3
    4
    5
    6
    7
    8
    9
    10
    11
    12
    13
    14
    15
    16
    17
    <select id="selectByConditionSingle" resultMap="brandResultMap">
    select *
    from tb_brand
    <where>
    <choose><!--相当于switch-->
    <when test="status != null"><!--相当于case-->
    status = #{status}
    </when>
    <when test="companyName != null and companyName != '' ">
    company_name like #{companyName}
    </when>
    <when test="brandName != null and brandName != ''">
    brand_name like #{brandName}
    </when>
    </choose>
    </where>
    </select>

添加数据

  • 定义 add 方法

    1
    void add(Brand brand);
  • 添加 sql 映射

    1
    2
    3
    4
    <insert id="add">
    insert into tb_brand (brand_name, company_name, ordered, description, status)
    values(#{brandName},#{companyName},#{ordered},#{description},#{status})
    </insert>
  • 调用接口方法

    1
    2
    3
    BrandMapper mapper = sqlSession.getMapper(BrandMapper.class);
    mapper.add(brand);
    sqlSession.commit();

    注意:sqlSession 默认开启事务,添加后需要提交事物。

    也可在获取 sqlSession 时关闭事务,即设置 autocommit 为 true

    1
    SqlSession sqlSession = sqlSessionFactory.openSession(true);

主键返回

在 insert 标签中 设置 useGeneratedKeys="true" ,keyProperty=”主键在类中的名称”,即可将主键返回到传入的示例对象中

1
<insert id="add" useGeneratedKeys="true" keyProperty="id">

例如如下语句,即可打印出返回的 id

1
2
mapper.add(brand);
System.out.println(brand.getId());

修改

修改全部字段

  • 定义 update 方法

    1
    2
    3
    4
    5
    6
    /**
    *
    * @param brand 修改后的 brand 对象
    * @return 修改的行数
    */
    int update(Brand brand);
  • 添加 sql 映射

    1
    2
    3
    4
    5
    6
    7
    8
    9
    <update id="update">
    update tb_brand
    set
    brand_name = #{brandName},
    company_name = #{companyName},
    ordered = #{ordered},
    description = #{description}
    where id = #{id};
    </update>
  • 调用接口方法

    1
    mapper.update(brand);

动态修改字段

  • 使用 <if> 标签,与多条件动态条件查询类似,不再赘述。

  • 同时用 <set> 标签代替 set 关键字,避免 sql 语法错误

删除

根据 id 删除

  • 定义 deleteById 方法

    1
    void deleteByIdAfter(int id);
  • 添加 sql 映射

    1
    2
    3
    <delete id="deleteById">
    delete from tb_brand where id = #{id}
    </delete>
  • 调用接口方法

    1
    mapper.deleteById(7);

批量删除

  • 定义 deleteByIds 方法

    1
    void deleteByIds(int [] ids);
  • 添加 sql 映射

    1
    2
    3
    4
    5
    6
    7
    8
    <delete id="deleteByIds">
    delete from tb_brand where id
    in (
    <foreach collection="array" item = "id" separator=",">
    #{id}
    </foreach>
    );
    </delete>

    使用 separator 添加分隔符。

    mybatis会将数组参数封装为 Map 集合, 默认:key 为 array ,value 为数组,可使用 param注解替换。如

    1
    void deleteByIds(@Param("ids") int [] id);
    1
    2
    3
    4
    5
    6
    7
    8
    <delete id="deleteByIds">
    delete from tb_brand where id
    in (
    <foreach collection="ids" item = "id" separator=",">
    #{id}
    </foreach>
    );
    </delete>

    还可使用 foreach 标签的 openclose 替代括号,美化代码

    1
    2
    3
    4
    5
    6
    7
    8
    <delete id="deleteByIds">
    delete from tb_brand where id
    in
    <foreach collection="array" item = "id" separator="," open="(" close=")">
    #{id}
    </foreach>
    ;
    </delete>

MyBatis 传参原理

参数封装

单个参数

  • POJO 类型:直接使用,属性名和参数占位符名称一致

  • Map 集合:直接使用,键名和参数占位符名称一致

  • Collection:封装成 Map 集合

    1
    2
    Map.put("arg0",collection);
    Map.put("collection",collection);
  • List

    1
    2
    3
    Map.put("arg0",list);
    Map.put("collection",list);
    map.put("list",list)
  • Array

    1
    2
    Map.put("arg0",array);
    Map.put("array",array);
  • 其他:直接使用

多个参数

Mybatis 使用 ParamNameResolver 类将多个参数封装为 Map<Object> 集合 ,参数1 默认 key 为 arg0 和param1,其他参数类似。

1
2
3
4
5
map.put("arg0",参数1);
map.put("param1",参数1);
map.put("arg1",参数2);
map.put("param2",参数2);
//...

使用 param 注解可替换默认键名(此时不能再使用默认键名,智能使用注解名称)

ParamNameResolver 源码

1
2
3
4
5
6
7
8
9
10
11
12
13
14
15
16
17
18
19
20
21
22
23
24
public Object getNamedParams(Object[] args) {
int paramCount = this.names.size();
if (args != null && paramCount != 0) {
if (!this.hasParamAnnotation && paramCount == 1) {
Object value = args[(Integer)this.names.firstKey()];
return wrapToMapIfCollection(value, this.useActualParamName ? (String)this.names.get(0) : null);
} else {
Map<String, Object> param = new MapperMethod.ParamMap();
int i = 0;
for(Iterator var5 = this.names.entrySet().iterator(); var5.hasNext(); ++i) {
Map.Entry<Integer, String> entry = (Map.Entry)var5.next();
param.put(entry.getValue(), args[(Integer)entry.getKey()]);
String genericParamName = "param" + (i + 1);
if (!this.names.containsValue(genericParamName)) {
param.put(genericParamName, args[(Integer)entry.getKey()]);
}
}

return param;
}
} else {
return null;
}
}
1
2
3
4
5
6
7
8
9
10
11
12
13
14
15
16
17
18
19
20
21
22
23
24
public static Object wrapToMapIfCollection(Object object, String actualParamName) {
MapperMethod.ParamMap map;
if (object instanceof Collection) {
map = new MapperMethod.ParamMap();
map.put("collection", object);
if (object instanceof List) {
map.put("list", object);
}

Optional.ofNullable(actualParamName).ifPresent((name) -> {
map.put(name, object);
});
return map;
} else if (object != null && object.getClass().isArray()) {
map = new MapperMethod.ParamMap();
map.put("array", object);
Optional.ofNullable(actualParamName).ifPresent((name) -> {
map.put(name, object);
});
return map;
} else {
return object;
}
}

使用注解开发

使用注解来映射简单语句会使代码显得更加简洁,但对于稍微复杂一点的语句,Java 注解不仅力不从心,还会让本就复杂的 SQL 语句更加混乱不堪。 因此,如果你需要做一些很复杂的操作,最好用 XML 来映射语句。

示例:

1
2
@Select("select * from tb_users where id =#{id}")
User selectById(int id);

insert update delete 注解类似


Mybatis 导入项目和使用
http://mrzzzz1.github.io/2023/03/08/Mybatis 导入项目和使用/
作者
Mrzzzz1
更新于
2023年3月22日
许可协议